
This chapter discusses how to finish your enamels with grinding and sanding for various situations, discusses the various enamel finishes such as sugar fire, mounting enamels onto something or other enamels, finishing metal and the Raku firing process, which is a finish to the Raku process.
TOC
- Glues
- Hand Polishing
- Metal Finishes
- Liver of Sulfer Tips and Tricks
- Patinas for Small Studios - book
- Raku
- Rivets
Metal Finishes
 Liver of Sulfur Tips and TrickS
If you want to use Liver of Sulfur and get great patina's in colors, not just black, watch this video by Pam East. My book mentioned Liver of Sulfur, but not nearly in the depth that Pam goes into. Check it out!
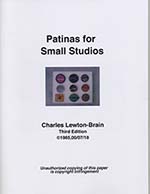
Patinas For Small Studios, 3rd Edition
This Patinas For Small Studios, a 44 page book by Charles Lewton-Brain, provides many different ways to finish your metal. Charles is a well known educator and writer.
Raku
In my first book, Jean Tudor wrote a project on the Raku process. I decided for the second book to make this an LTT mini project, which is on pages 109-110. In both she lists the enamels to use that contain either copper oxide (the best to use) or manganese oxide (the second best to use). In both, she lists unleaded and leaded Thompson Enamel's enamel (of course other brands with these oxides should also work). However, one of the unleaded is labeled incorrectly - Jean has 2910 Oil Gray and she meant 2910 Elan Gray (Oil Gray is 2915).
Here are the results of some testing Jean did with the Manganese Oxide enamels:
| Thompson En. Color | # | Order of most Manganese |
| Chestnut Brown | 2190 | 1 |
| Russet Brown | 2140 | 2 |
| Rose Purple | 2715 | 3 |
| Elan Gray | 2910 | 4 |
Jean suggests that people experiment with the two browns. But the manganese oxides are subtle, giving a sort of delicate nickel or sometimes goldish color. It's not bold like the strong copper that she gets with the copper oxide blues/greens/turquoises. She feels she gets the best manganese results with the vintage leaded color 834 Smoke Gray. When creating with Raku, it's fine to mix leaded and unleaded enamels as there are so many interesting things that happen with breakthrough and other vagaries of the two enamels working together. The best sources to get old Thompson Enamel leaded enamels are in my resource list in the book, but provided here for expediency: E-namels.com and Schlaifer Enameling Supplies.
Jean went back to her old tests, which were all stored in the dark in a closet. What she found was that all the ones with unleaded enamels used for the Raku coloration lost their color, but all the ones with leaded enamels were fine. Note that all the pieces she has displayed in her house with either leaded or unleaded enamels were just fine.
I am trying to do some research on why the color sometimes fade. I called a local raku potter, Tom Neugebauer who I thought might give some insight. He says this can happen with Raku pottery too, although he never uses leaded glazes so he cannot comment on that aspect. However, he feels it's the air, not the light or heat and he knows it's the oxygen in the air that causes the copper in luster glazes, over time, to re-oxidize and turn green/ muddy (Tom found this article about raku on pottery). I also called Cullen Hackler, a ceramic engineer, the Managing Director of The Enamelist Society and the Technical Director of the Procelain Enamel Institute, who says he agrees, it's the air, but specifically it's the oxygen in the air - remember that Raku is done by quickly putting the piece in an oxygen reduction environment so it makes sense that adding the oxygen back in would change the colors. Tom feels that the deeper the color goes (maybe by putting the piece faster into the oxygen reduction environment and keeping out more air for a longer period of time) the less it may fade. He also has impirical experience that wrapping a Raku piece in bubble wrap or plastic will remove the coloration (maybe because of a chemical in the plastic???). Both Tom and Cullen agree that sealing the Raku will deprive it of air and thus most probably hold the color. The sealant can be something like wax, which is fine over enamel.
This is an on going search for more information so please come back again to see if more has been added. If you have more information, please contact me.
Hand Polishing
On page 108 in the book Don Viehman wrote an LTT on how to hand polish a Cloisonné. Of course not all enamelists do it the same way and Merry-Lee Rae is no exception... see what she says and more about Cloisonné on this link.
Glues
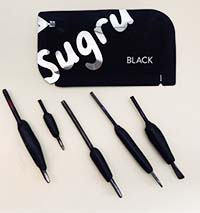 Page 111 in the book, has a section on Mounting and that includes sticky stuff to use with enamels. Here is a new one: Sugru Mouldable Glue (check here and here for what you can do with this), which as its name infers, can be molded to shape and sets strong by turning into silicone rubber. It comes in various colors (can customize the color, too), texturized (as for making custom stamps) and more. Sold at various on-lines stores or good local hardware stores and either just the glue or in kits.
The Karolina from the company's customer service department says: "the name Sugru comes from thr Irish language word "súgradh" fro "play" :) The creator of Sugru is an Irish lady called Jane Ní Dhulchaointigh, an artist, designer, and inventor." Karolina also said if you store unopened packages in the refrigerator you can increase it's shelf life by up to 3 times.
Kay Yee uses Sugru for a variety of uses. She began using it on her husband’s ceramic pots. She added little pads to the bottom of the pot and when they hardened they kept the ceramics from scratching her table top! She also uses it to modify tools - she has purchased these tiny chasing tools but found them too small fo her hands so she thickened them up with the Sugru Mouldable Glue - see Photo at the right. She suggests using the colored glues to help with identification of each tool when they are stored.
Note: other materials can be used to mold or coat tools. One moldabel rubber product is called Jet, which comes in pellets that are warmed and then molded to produce the shape you want. Once cooled, it can be re-heated and molded again into something else. This product can be used to form a new tool like a hammer. There is also a "tool dip" product that allows you to make handles and such on tools. It has an expiration date and does not dry nicely afterwards. However, Kay likes the Sugru product instead of either of these.
Kay also uses this glue to help her set her enamels, and although these are preliminary results, feels it will work for all enamels, not just Blackboard. Here is what she does:
 |
 |
Here are her piece parts - the setting, the enamel (shows the back) and a wad of glue. This shows that she is ready to stick a lump of Surge in the middle of the enamel*. She doesn’t spread it out, she is just using it to sit the enamel level in the setting at the correct height. The “tab prongs” in the setting are already cut, so it is important that the enamel doesn’t sit too low or too high. Too low the prong may crack or won’t match the others, too high and it won’t bend. The directions say to allow to cure 24 hrs but she has found overnight works fine. * Kay didn't feel she needed to roughen the area to be glued as she had prongs to actually hold the piece in, but conventional wisdom is to usually roughen up the enamel surface to give the glue more surface to adhere. | Finished piece with prongs set. |
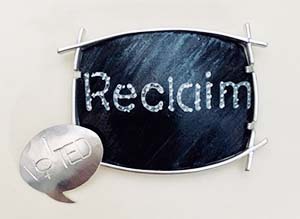
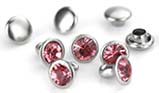 Rivets
Riveting is a good way to attached various elements when you are ready for the final step of constructing your piece. There are a variety of rivets out in the market and some are easy enough to make yourself. Here is one not so easily found - rivets wtih crystals on top and designer heads! Sold by StampingOutLoud.com, the ones with crystals do require a special setting tool so the crystal is not in danger of breaking. Of course always be careful when riveting an enameled piece so as not to crack your enamel.