
As computers and other technologies advance, there is more and more than can be done to aid enameling. This chapter provides information in this area. For example, it already provides a few ways your smart phones can be used to aid enameling - like an app that converts photos to etchable images.
From talking with others, the author finds out additional uses of technology. This page provides the new information, not in the book, in the order of the sub-table of contents enteries.
How to organize this page was a bit of an issue so I decided to first list the Technology chapter's Table of Contents (TOC). Within this are links to the new information.
Technology Chapter - TOC
- CAD – Computer Aided Design
- Electronics
- Computer Graphics
- Smart Phones/Tablets
- Color Value Check
- Magnifier on the iPhone
- Electroytic Etching / Electro Etching - see more on etching and the use of Photoshop
- Electroforming
- Engine Turning Machines
- Engraving Fused Enamel
- Machines for Scrapbooking - here is one comparison but it doesn't include the Sizzix - look for others on-line
- Silhouette Curio
- Sizzix esclips2 Machine
- Cricut Maker (not in the book)
- Photos Into Drawings
File/folder Naming
This one does not fit into any category of the TOC, but...
My background is math and computer science. Most, if not all, people with this background are very organized. From my experince in programming I know how important it is for code and files to be organized and easy to maintain. This led me to develop a naming convention for files and folders associated with my artwork. I offer my convention here for those of you that have trouble coming up with a file name for a piece and/or have trouble finding it.
- Each piece I make has an unique number and a text name. I keep these consistent for all items I have associated with that piece, as explained below. I get my number from the database that I keep my information in (it generates a number with each new entry). Most people don’t have a database, but you can keep an Excel file (or another program) with a list of all your pieces, allowing you can see what is the next number available to you.
- I don't include any blanks in my file/folder names
- I capitalize all words. See below for examples.
- By being consistent with the naming - using a unique number plus the title of the piece or a short phrase, helps me in these ways:
- Easy to come up with the name without even much thought
- easy to do a search on my computer for all files associated with it
- because the name starts with a number, they all sort in numeric order and are easier to organize
- file/folder names are consistent which helps keep me organized - if I know the piece’s name and number, I automatically know what the names of the files/folders are and helps me maintain my files/folder better
- All one of a kind pieces have just a 4 digit number (I don't expect to make more than 9999 pieces in my lifetime) - for example: 3101. If it’s in an Edition then the number has as -# on it like 3101-1 or 3101-2. This way you can definitively identify a particular piece.
- I use this number to START all file/folder names I associate with the piece. For example, I mainly make buttons for button collectors these days instead of jewelry. And with each button I give a Card of Authentication which shows a pix of the button, gives its name, number and description, including all the materials/techniques I’ve used on the piece. This is helpful for the buyer when they put the piece in a competition, but I also did it as a marketing tool so that they have my contact info. lol. Furthermore, I like to document things - such as my book or website!
- Each file/folder associated with the piece has a text name in addition to the number. The name is either the piece’s title or a short reference. For example if I have a dragon edition, named Circular Dragon...
- the filename of the photo of the piece would be 3101-1_CircularDragon.jpg (note the lack of blanks and the capitalization). I do use "-" and "_" as separators instead of blanks.
- the folder for all the photos would be 3101_CircularDragon
- the Card of Auth for the file would be 3101-1_CircularDragon.ai or 3101-2_CircularDragon.ai, etc.
- If the piece does not have a name (all editions do but one of kind don’t) the file for a dragon might be 2964_ChineseDragon.jpg and the Card of Auth would be 2964_ChineseDragon.ai
- I hope this helps some of you out there. If you have an improvement to my scheme, please let me know. I'm always looking for improvements for everything I do.
Smart Phones/Tablets
The book discusses different ways to use these devices for enameling. Here are some not already listed...
Color Value Check
Sometimes enamels of different colors have the same value and thus are not a good match for side by side coloring. To test for this, take a photo of the colors on your device and edit the photo to black and white. If there is not much of a difference in black and white, you might consider choosing different colors.
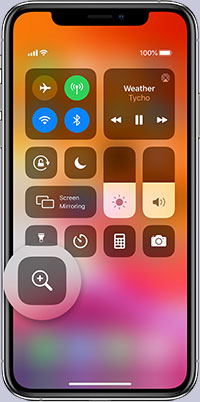 Magnifier on an iPhone
Did you know that your iPhone can be used as a magnifier? I'm sure the other smart phones have this feature, but I am not familiar with them. Just knowing, though, that you have this feature will allow you to search the web for how to use it. The instructions below are for Apple iPhone (and similar for iPad) devices.
The magnifier allows you to freeze an image, enlarge it to various magnifications, and save an image for future reference. Certainly better than a normal glass. You can also use the flashlight to brighten the image or use Auto-Brightness, and apply color filters
To start using your magnifer you will have to enable it.
- Go to Settings -> Accessibility (older versions of the OS might need you to go to Settings->General->Accessibility)
- Tap the Magnifier feature and then turn it on.
- The magnifer will be added to your accessibility shortcut screen. But can also be accessed by triple clicking the right Side-Button. If your device is older and has a Home Button, try triple clicking the Home Button to access the magnifier.
How to use
Once you have enabled the magnifier, access it by one of the methods described above. The screen you get is similar to the camera. Focus the camera's eye over the object to be viewed.
Then you can...
- Magnify the image - use of the slider bar or the normal pinch press-out method you use for photos
- Freeze the image - tap the freeze frame button
 . Once an image is "frozen" the button's outer rim turns yellow. To unfreeze the time, tap the button again. When frozen, you can move your iPhone around and not have to be pointing at the image - it will still be in the magnifier window.
 - Focus better - tap the screen. To lock the focus, tap the Lock Button; tap again to unlock the focus.
- Save an image - touch and hold the image. A "dialog box" wtih two choices appears - either Save Image or Share. Just tap Save Image and the image will be saved into your Recent photo folder (camera roll).
- Brighten the image - tap the light icon (lightening bolt); tap again to toggle off
- Apply Color filters - tap the 3-circle icon on the right side bottom of the magnifer. You will be presented with options to play with for adjusting your image. This might be useful if you are color blind or in some way visually impaired.
For more information, watch this video by MacRumors.
Computer Graphics
There are bascially two types of graphics on the computer - Vector and Raster. Here is a descripton of how they differ. Note two things: photos have to be raster and if you are drawing and want to re-size the image, vector is a better format. The industry standard for vector graphics is Adobe Illustrator, and for raster graphics is Adobe Photosop. These are expensive software programs. The good news is that free or inexpensive, less feature rich programs, are available - search the web. Just be sure that the software will allow the saving of files in .jpg and .svg which are needed for many devices.
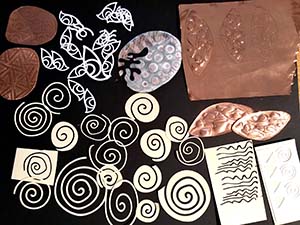 Cricut Maker
The Cricut Maker is another plotter/cutter that can help you with enameling. Teri Brudnak has cut "Paper, cardstock for roller printing and stenciling enamels, drafting film, adhesive vinyl masking for anodizing and etching, wax stencil paper, 40 gau copper sheet (also embossing for copper sheet), thin plastics and decals." See the photo at the right. Here is her document that Teri has permitted me to post that describes the differnent types of computer grahics, some basics in using Adobe Illustrator and links to free equivalent drawing programs, basics on preparing and saving files using the Cricut Maker. Go Teri!
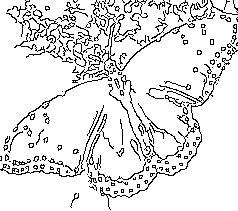
Photos Into Drawings
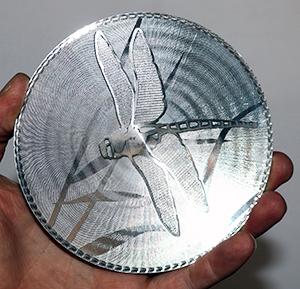
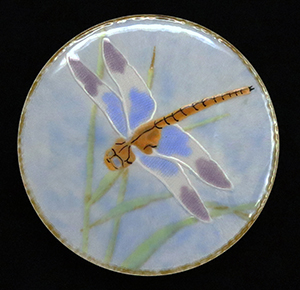
Here is a really great free service to turn your photo into a line drawing. it's by a site called Rapid Resizer and could not be easier to use. I find it useful to get proportions correct. The resutling drawing is the same size as the one you started with so if you need a certain size, use a photo with the correct sizing. Here's a sample:
 |
 |
Engine Turning Machines
Engine turning may be a dying art, but some still do it. In the past most engine turners do not sell to other artists, but here is one who does! His name is Tig and he is in Canada, but from the US. Tig's Engine Turning site is informative and his work is beautiful. He works with not only Rose and Straight line machines, but with a Brocade machine which gives incredible results. Photos will be coming soon!
 |
 |
| 5" Guiloché using the 3 machines - Rose, Straight line and Brocade |
Enameled! |