
Sgraffito is the technique of "scratching" through raw enamel - grain or liquid. The Sgraffito project in the book has many variations to choose from, but of course there can always be more - here is one.
Marbling
 I have always been interested in the beauty of marbling paper or fabric. In Turkey, it's called Ebru (see photo at left), and you can find many how-to videos on the web that show various patterns - here is one video. In enamel this is called Sgraffito, although Tom Ellis has suggested it could be called Cold Scrolling.
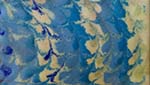
I was interested in seeing if I could do this with liquid enamel, and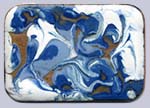 thus took an Ebru class and made many beautiful papers and fabric. I tried it with liquid enamel, but found that because the enamel has clay in it, it dries too quickly. I can get some swirling, but not the Ebru patterns. See a sample on the right of what I have done. Although I like this, it is not what I wanted to achieve. Although as I'm writing this, I wonder if the enamel could be made much thinner and then tried (I guess I'll have to try that one!). I do think, though, that to achieve Ebru patterns, your piece has to be bigger.
 While writing the book, I talked with Kathy Wood about this and and she sent me the photo on the left that is on page 265 in the Sgraffito Variations section of the book. She did this with a product called Liquid Stringer. So this was getting closer and made me interested in Liquid Stringer!
Lydia Morrison has told me about a product called Glass Tattoo Gue. Here are some videos about this product. Although they do not use it for marbling, it seems like it might be able to be. This needs some testing. I have not yet researched the similarity between Liquid Stringer and Glass Tattoo Gue, they do seem similar and if I find more information, I'll put that in the Supplements And Add-ons Chapter on this site. Note that neither of these use Liquid Form Enamel, but I don't care if the liquids are used, I just would like to achieve the effect of Ebru.
Tom Ellis has also been experimenting with marbling. He wrote an article for GOM in August 2009. Here is what he did...
| 1. Clean your metal and counter enamel it. | |
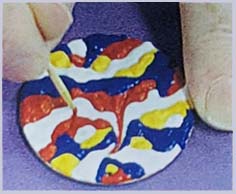
2. Choose (in this case) four opaque enamels. Wet as for wetpacking, being sure not to make them too watery because they will then float together and you want to control the marbling. 3. With brush or spatula, lay down groupings of your colors where you wan them. See photo to the right. Continue until all of the base metal is covered. |
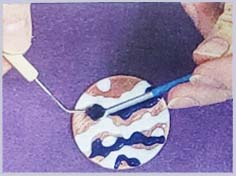 |
4. Using a toothpick or other sharp tool, draw through the wet enamels moving one color into another. Make sure adequate water is present in enamel, too little and the enamel will be difficult to manipulate, too much water and one color will flood another. Add water with a wet brush and remove water with a paper towel held at the edges so as not to disrupt your design. |
 |
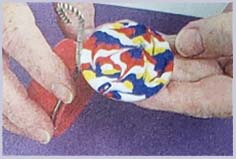
5. When satisfied with the design, pick up your piece and run the twisted end of a sifter along the edge of it until all the enamel evens out and settles to a flat surface. 6. Wick out remaining water with a paper towel. 7. Dry as any other enameled piece before firing at 1450° to completion. |
 |